So, you got a server linked to a SAN box. You define some LUNs on that SAN box. You link the LUNs to the server and you want to start using the LUNs on the server.
Let’s see:
xen02:/dev# ls -l sd*
brw-rw---- 1 root floppy  8,   0 2008-04-15 16:51 sda
brw-rw---- 1 root floppy  8,   1 2008-04-15 16:51 sda1
brw-rw---- 1 root disk    8,  16 2008-04-15 16:51 sdb
brw-rw---- 1 root disk    8,  32 2008-04-15 16:51 sdc
brw-rw---- 1 root disk    8,  48 2008-04-15 16:51 sdd
brw-rw---- 1 root disk    8,  64 2008-04-15 16:51 sde
brw-rw---- 1 root disk    8,  80 2008-04-15 16:51 sdf
brw-rw---- 1 root disk    8,  96 2008-05-09 13:35 sdg
brw-rw---- 1 root disk    8, 112 2008-05-09 13:35 sdh
brw-rw---- 1 root disk    8, 128 2008-05-09 13:35 sdi
brw-rw---- 1 root disk    8, 144 2008-05-09 13:35 sdj
brw-rw---- 1 root disk    8, 160 2008-05-09 13:35 sdk
brw-rw---- 1 root disk    8, 176 2008-05-09 13:35 sdl
brw-rw---- 1 root disk    8, 192 2008-05-09 13:35 sdm
brw-rw---- 1 root disk    8, 208 2008-05-09 13:35 sdn
brw-rw---- 1 root disk    8, 224 2008-05-09 13:52 sdo
brw-rw---- 1 root disk    8, 240 2008-05-09 13:52 sdp
brw-rw---- 1 root disk   65,   0 2008-05-09 13:54 sdq
Phew, how to identify which drive corresponds to which LUN, especially if you have some equal-sized LUNs.
Fortunately, we have this:
xen02:/dev/disk/by-id# ls -l
total 0
lrwxrwxrwx 1 root root  9 2008-05-14 16:11 scsi-1 > ../../sdl
lrwxrwxrwx 1 root root  9 2008-04-15 16:51 scsi-3600a0b8000320d200000038e47e1430a > ../../sdb
lrwxrwxrwx 1 root root  9 2008-04-15 16:51 scsi-3600a0b8000320d200000039047e3f21f > ../../sdd
lrwxrwxrwx 1 root root  9 2008-04-15 16:51 scsi-3600a0b8000320d200000039447f4f916 > ../../sdf
lrwxrwxrwx 1 root root  9 2008-05-09 13:35 scsi-3600a0b8000320d200000041f48073120 > ../../sdh
lrwxrwxrwx 1 root root  9 2008-05-09 13:35 scsi-3600a0b8000320d200000042348076e8c > ../../sdj
lrwxrwxrwx 1 root root  9 2008-05-09 13:35 scsi-3600a0b8000320d200000043748206a2e > ../../sdn
lrwxrwxrwx 1 root root  9 2008-05-09 13:52 scsi-3600a0b8000320d200000043a48244540 > ../../sdp
lrwxrwxrwx 1 root root  9 2008-04-15 16:51 scsi-3600a0b8000322cba0000067c47e3f289 > ../../sdc
lrwxrwxrwx 1 root root  9 2008-04-15 16:51 scsi-3600a0b8000322cba0000067e47e3f2cc > ../../sde
lrwxrwxrwx 1 root root  9 2008-05-09 13:35 scsi-3600a0b8000322cba000007ca48076f1b > ../../sdi
lrwxrwxrwx 1 root root  9 2008-05-09 13:35 scsi-3600a0b8000322cba000007da480dc9cd > ../../sdk
lrwxrwxrwx 1 root root  9 2008-05-09 13:35 scsi-3600a0b8000322cba000007de480f5683 > ../../sdm
lrwxrwxrwx 1 root root  9 2008-05-09 13:54 scsi-3600a0b8000322cba000007e0482445e4 > ../../sdq
lrwxrwxrwx 1 root root  9 2008-05-09 13:52 scsi-3600a0b8000322cba000007e248244632 > ../../sdo
lrwxrwxrwx 1 root root  9 2008-05-14 16:11 scsi-3600a0b8000322cba00000890482afe68 > ../../sdg     <---
lrwxrwxrwx 1 root root  9 2008-04-15 16:51 usb-M-Sys_uDiskOnChip_0F801A713040492E > ../../sda
lrwxrwxrwx 1 root root 10 2008-04-15 16:51 usb-M-Sys_uDiskOnChip_0F801A713040492E-part1 > ../../sda1
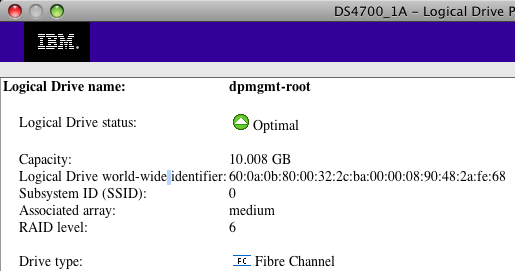
Exactly, by using the /dev/disk/by-id virtual directory, you can see which disk id corresponds to which LUN, as you can see in the next (partial) screenshot:

That’s nice! Now we know that our LUN called dpmgmt-root corresponds to 60:0a:0b:80:00:32:2c:ba:00:00:08:90:48:2a:fe:68 which, according to our second listing, corresponds to /dev/sdg.
Using such long device paths isn’t really convenient though, so let’s take this a little further.
Format the device using your preferred filesystem and label your filesystem:
xen02:/dev/disk/by-id# mkfs.ext3 -L dpmgt-root scsi-3600a0b8000322cba00000890482afe68
mke2fs 1.40-WIP (14-Nov-2006)
scsi-3600a0b8000322cba00000890482afe68 is entire device, not just one partition!
Proceed anyway? (y,n) y
Filesystem label=dpmgt-root
OS type: Linux
Block size=4096 (log=2)
Fragment size=4096 (log=2)
...
Reboot your system and check this out:
xen02:/dev/disk/by-label# ls -l
total 0

lrwxrwxrwx 1 root root  9 2008-05-14 17:28 dpmgmt-root > ../../sdg
lrwxrwxrwx 1 root root 10 2008-04-15 16:51 root > ../../sda1
lrwxrwxrwx 1 root root  9 2008-05-09 13:35 semail-root > ../../sdn
lrwxrwxrwx 1 root root  9 2008-04-15 16:51 tempvm-root > ../../sdf
So now, we can address our device as /dev/disk/by-label/dpmgmt-root on every machine that has access to that LUN, now matter what the actual real device path is on that machine.
What’s even better, is that you even don’t even have to reboot to update /dev/disk/by-label/
Just trigger udev to reload the system information on /dev/sdg:
xen06:/dev/disk/by-label# echo add > /sys/block/sdg/uevent
xen06:/dev/disk/by-label# ls
dpmgmt-root root semail-root tempvm-root
Et voilà!


